Hey Friends!
It's Kerrie again from WOOD Creations! Today I am here to do a Tutorial on Photo Blocks. This is where you put your photo on a block or photo plaque and it looks like its on a canvas. Great news for you is, we sell photo blocks, plaques and ALL the supplies to finish this project at WOOD Creations! YAY!
I chose this project because for one, it's SO EASY! Two, it's almost Christmas time and these make such FUN and Inexpensive Gifts! :) I also have a step by step tutorial on our Craft Tips Tab at the top of our WOOD Creations Blog. I will also have this labeled on this blog, at the side if you ever need it for future use! This blog post will also be on Pinterest if you want to Pin it to your boards as well! Don't forget to follow us on Pinterest and also our blogs! We are also on Facebook as well and we are ALWAYS having giveaways! You won't want to miss out!
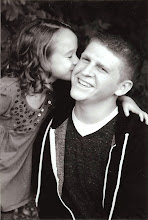
This is the finished project I did of my cute little family! It took me about 30 minutes to do, and that is adding the drying time on there! It's that Simple! :) I LOVE this photo that my BFF Kellie Hales took! She is AMAZING and does such a great job!
First you want to get your supplies. I chose the photo block to use this time because you can hang it on a wall or set it on your shelf or end stand. These also come in various sizes. I chose to paint the edges black, but you can also do it any color and it will still turn out great!
Once I had all my supplies, I sanded the edges to make sure they were all smooth. You can take a piece of sand paper or even a nail file works great!
Then I painted the sides and around the edges on the front black. You don't need to paint the whole front because your picture will cover it.
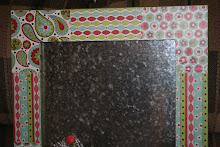
Once the paint was dry, I applied a coat of Mod Podge on the front of the photo block. You want to make sure every part is covered, but make sure there aren't any clumps. There are three reasons that your picture would bubble, they are the same reasons that your paper might also bubble.
1. If you miss applying a part of the wood with Mod Podge and it's dry when you apply your photo/paper, this will make it bubble.
2. If you have big clumps and don't get them out, this will also make your paper bubble.
3. If you put a top coat on your photo/paper and the coat underneath isn't dry, this will also make your paper bubble.
As you can see, I put a nice coat of Mod Podge on there. I made sure everything was covered, but that all the big clumps were out.
I apply my Mod Podge with a paint brush. You can use a Sponge Brush as well. It's just what you are more comfortable using.

Next, put your photo on top of the block. Once I put my photo on the block, I use a clean rag and rub all over my photo to make sure that the photo is applied to the block. Then I take my scraper (you can also use a credit card or Pampered Chef scraper) and gently scrape over my photo like I would applying paper. You don't want to do it very hard. You also want to make sure you have a rag or paper towel handy in case the Mod podge comes out the side and gets on the scraper. I wipe off my scraper often to assure that there isn't any Mod Podge on it. The Mod Podge won't ruin your photo, so if some gets on, it's ok. Then I take my fingers and rub all over the photo to make sure that there aren't any bubbles underneath and it's all flat. Make sure to scrape around the edges too, so they are applied good. Then you will want to let it sit for about 10-15 Minutes. (I use my rag first because you can get most of the bubbles and Mod Podge out that way. Then you won't have to push with your scraper very hard.)

Next, you'll want to get your Texture Cream, Roller, and Plastic Gloves, which we also sell at WOOD Creations. You'll want to make sure that you are wearing plastic gloves when you apply your texture cream. You don't want to get the texture cream on your hands. It's hard to wash off and will dry out your hands.
Once you've waited 10-15 minutes, you are ready to apply your Texture Cream. After I put my gloves on, I dip my finger in the jar and get a clump of texture cream. A little bit goes a LONG way! I only used about three of these.
I just dab it on the photo. I try to spread it out just a little bit, so it will cover all over the picture. If you don't have enough at first, you can always add more. So I start with less and then if I need to, add more. This way you aren't wasting any texture cream.
Then I take my roller and roll it all out. I spread it all over with my roller and then I just roll one way. I will do it side to side and then change to up and down.
If you do it side to side and then up and down, it gives it a canvas look when it dries. Once you've got it all spread out, you just have to wait for it to dry! You can put it in front of a fan or heater and it will dry faster. The length of time to dry just depends on how much texture cream has been applied. When you are washing out your roller, make sure to keep your gloves on. I wash them out with warm water, you can also use a little bit of soap if you want. Make sure not to take your gloves off until you have the roller all washed out.
Then, once it's dry you can add some ribbon to it if you want and you are done! You don't have to add ribbon. It looks great either way! The great thing with the texture cream is, not only does it make it look like a canvas, but it also protects your photos! This project will last for ever! It's such a fun way to display your photos in your home or to give as a gift!
There are so many things you can do with your photos! The ideas are endless! No matter if you put them on a block or a plaque, the steps are all the same! You could even put them on smaller pieces of wood and put them on a candle stick. We sell the candle sticks at WOOD Creations as well! Come see us and pick up all the supplies you will need to finish this fun project! :)
Thanks for stopping by!
Kerrie :)


 The next step is to paint all the edges and back Black. I also paint the very edge on the front as well. That way if your paper doesn’t go all the way to the edge, the raw wood isn’t showing. You don’t need to paint the whole front because we will be putting paper on the front. Remember we sale all the paint, paper, chalk, glitter, ribbon and everything you will need to finish your project at WOOD Creations.
 After I have painted everything, I cut my paper out. That gives the paint some time to dry.
 Once I have done these two steps, I put my paper on and run a plastic scraper all across it. If you don’t have one, you can also use a credit card or a plastic Pampered Chef Scraper also works great! After I have run my scraper all across the paper, I then run my fingers across everything and make sure there are no lumps in the paper and I’ve gotten everything smooth. This helps to know that the clumps are out so the paper doesn’t bubble. If I have paper hanging over the edge a little bit you can get some sand paper or a nail file and just scrape the edge a little bit to get the paper to the edge. If you push too hard, you might need to touch up the paint on the sides. After I have done all these steps, I let it sit for about 10 minutes to insure that the Mod Podge is dry under the paper. If the paper isn't dry and you apply a top coat, this is will make the paper bubble!
 This is where you can apply your chalking. (We also sell this at WOOD Creations) I put my chalking on before I put my top coat of Mod Podge because it shows up a little darker. If you happen to forget, you can still apply it on top of the Mod Podge once it’s dry. To apply the chalk all you do is rub it along the edge of the wood. It’s actually like a stamp pad and not actual chalk. You can add as much or as little as you want! You really can’t go wrong with the “Chalking”! I LOVE it! I honestly don’t know what we did before chalking? Stippling?? Ha! Ha! That seems so “Old School” now! The chalk kind of gives it a little character and can also make it look a little antiqued as well! It just gives your projects a little something, something that adds that finishing touch!
 Once you have your chalk all around the edges, you can now apply your vinyl! Applying vinyl is also really easy! All you need to do is pull back the clear side of the transfer tape. If the vinyl sticks to the paper side, just go back a little bit and push the sticky taped side with your finger and it should pull back with it. This is another one of those things that practice makes perfect! Once you’ve got your vinyl onto the sticky side of the transfer tape, get your wood and put it in front of you. I hold my vinyl up just off the paper to help make sure it’s going on straight. You will want to be very careful not to get the vinyl too close to the paper because it will stick to it and probably won’t come off! Once it’s straight, I lay the tape onto the wood and then get my scraper again that I used to apply the paper and scrape the top of the transfer tape all over. Then I start at the top left side and start to pull the transfer tape back. You will want to go a little slow to assure that the vinyl doesn’t come off with it. If it happens to pull back with it, just take your scraper and go over it again. You can even use your finger. I apply my vinyl before I apply the top coat of Mod Podge so it seals it. If you happen to forget and put a top coat of Mod Podge on before you apply your vinyl, that’s okay too. You can still apply your vinyl on top. You will just want to make sure your Mod Podge is TOTALLY dry or it will make the vinyl not stick.
 Once you have your chalking and vinyl done, you can now apply a top coat of Mod Podge! I put a top coat on top of my paper so it seals it to the wood! You don’t have to do this step if you don’t want. I have also found that it makes it A LOT easier to dust and also gives it a finished look!
 While you are letting your Mod Podge dry, you can tie a little bow around the witch’s hat. I put a little dab of hot glue under the bow to ensure that it won’t slip off. Then once everything is dry I hot glue the hat onto the wood so it will stay. You don’t have to have the witch’s hat! I just thought it added a cute little addition to the project! We also sell the Witch Hats at WOOD Creations!


